
MANAGE YOUR TEAM'S SCHEDULE

Effectively manage your employees' schedules by adding, editing, and removing bookings to create an optimal work schedule.
The Calendar is where you can view, add, edit, and remove bookings for your team's projects. It provides a default list view of resources with their respective bookings, time entries, availability, and vacations. To customize and filter this view, refer to our guide on customization options.
Bookings are represented as colored blocks on the Calendar, showing the daily durations and project names associated with them. This intuitive presentation allows for quick and efficient identification of bookings, facilitating effective project management and scheduling.
Add new bookings
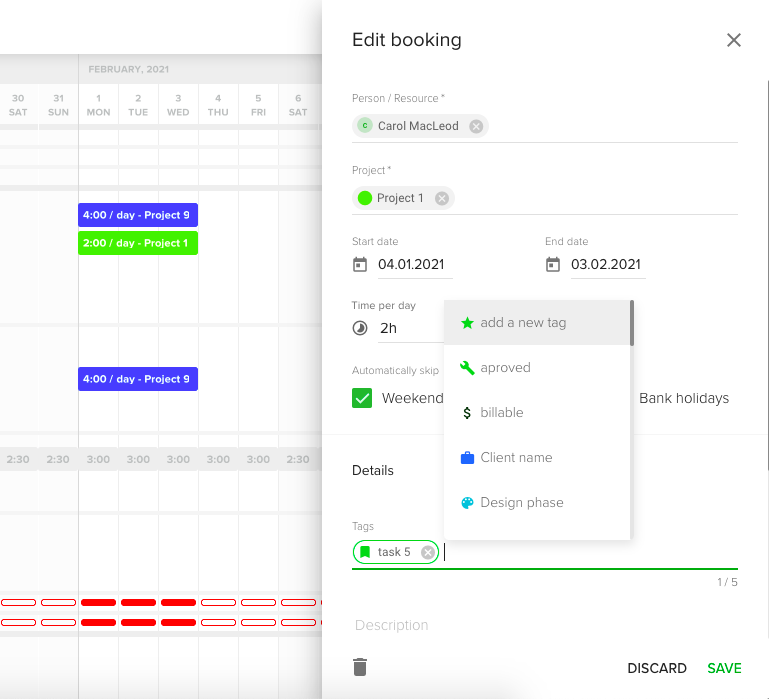
To add bookings directly from the schedule, follow these steps:
- Scroll to the desired person/resource on the schedule.
- Hover over the day when you want the booking to start.
- Click the plus icon that appears on hover.
- Hold and drag the booking to the day when you want it to end.
- A drawer will appear, allowing you to provide additional details for the booking.
You can also choose to automatically skip weekends, approved vacations, and bank holidays. By selecting this option, long bookings will be scheduled only on working days.
Furthermore, you can assign up to 5 tags to your booking. Refer to our guide on defining new tags for more information.
Lastly, you have the option to add a description to provide further context for the booking.
Once you have entered all the necessary information, click "Save" to finalize the booking.
Managing Bookings
When interacting with bookings in our system, you will notice three icons that provide essential functionality:
- View More: By hovering over a booking or clicking on it, you can access a detailed information drawer. This drawer presents comprehensive details about the specific booking, allowing you to review all relevant information at a glance.
- Splitting Mode: Our splitting mode feature enables you to divide longer bookings into shorter ones. This functionality proves particularly useful when you need to accommodate additional bookings within limited timeframes. You can efficiently split and manage your bookings with a simple click, optimizing your scheduling process.
- Trash Bin Icon: If you wish to remove a booking, you can click on the trash bin icon associated with that specific booking. This action will effectively delete the booking from your schedule. Please exercise caution when using this option, as deleted bookings cannot be recovered.
You can seamlessly navigate and manipulate your bookings by leveraging these intuitive icons, ensuring optimal control over your scheduling operations.
Remove Bookings
To remove a booking from the schedule:
- Locate the booking you want to delete by hovering over it or clicking on it.
- Click on the trash bin icon that appears.
- The booking will be promptly removed from the schedule.
As a manager or owner within the system, you possess the authority to remove any bookings as needed. This capability grants you full control over your scheduling process, allowing you to manage and adjust bookings according to your requirements.
Booking Notifications
Our system offers the option to enable notifications for assigned team members (exclusive to Team Members) when a booking is created, updated, or removed. By activating the Booking Notification feature, you can ensure that relevant individuals receive timely updates and stay informed about any changes to their bookings.
To enable this feature:
- Navigate to the Settings menu and select the Advanced section.
- Access the Notifications tab.
- Enable Booking email notification.
By leveraging this notification capability, you can enhance communication and keep all involved parties well-informed about booking-related activities within your organization.